Benchmark #1, Benchmark #2, Benchmark #3
In Math, we did a project called The Art of Construction. In this project, we were taught how to make circles, triangles, squares, and vesica pisces using only a straight edge and a compass. We had to create an art piece using these shapes. Our art piece could be made out of any medium, but we had to show the shapes that we had to have in our art piece. In the end, we had to create a page on our Digital Portfolio and describe the project.
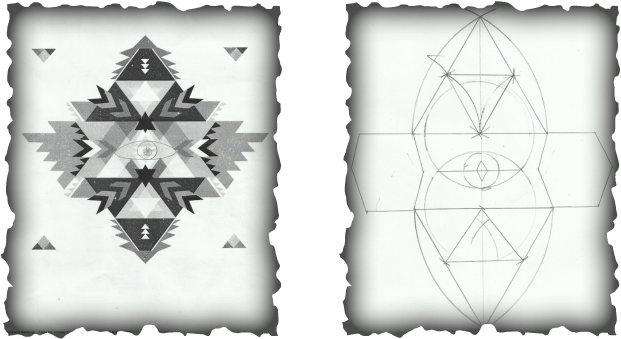
For our first Benchmark, (the first picture at the top of the page), we had to choose an image and we had to sketch it. We had to keep in mind that the image had to be made out of geometrical shapes. For my image and sketch, I chose to look up Aztec patterns and images. At first, I wanted to really do something challenging and I was looking into doing the Aztec calendar because like my dad, I really like the Aztec Culture. I wanted to do the entire Aztec calendar, then I realized that it was going to be too challenging, so I decided to just do the middle circle, but there were a lot of curves and it was going to be difficult to sketch with a straight edge and compass. I looked into super heroes but I couldn't find a way to incorporate all the mandatory shapes. I then decided to choose an image that was an Aztec print image. I made some adjustments to make sure it had all the shapes I needed, and then I got an approval from my teacher.
For our second benchmark, we had to incorporate all the shapes that created the image. At first, I just used a straight edge and not a ruler. I got feedback from the teacher and he told me to show the construction and how I created the image with the straight edge and the compass. I took his feedback and showed my work and this time I used both the compass and the straight edge. I also had to write the instructions on how to create my art piece and that was pretty difficult, but after re-constructing it a few more times, I was able to write the instructions below:
1) Use a straight edge to draw a line at the top of the tile (enough space to create a upside down triangle), and another line at the bottom of the tile.
2) Put the needle point of the compass on one end of the line and adjust the compass pencil to the other end of the line and draw a semi circle. Then you put the needle point of the compass on the other end of the line, do the same, and connect the intersections with a straight edge. (Do the same for the other line)
3) Next, you put the needle point on the tip of the triangle and draw a semi circle across the inside of the triangle. Then you put the needle point on either side where the semi circle and triangle side intersect and you draw a semi circle across the middle of the triangle and connect the intersections with a straight edge. (Do the same for the other triangle)
4) Now, you draw a line from the tip of the top triangle to the tip of the bottom triangle. Place the needle tip of the compass in the top (or bottom) triangle edge where the line intersects with the bottom edge of the triangle (that is facing towards the middle) and adjust it so that it isn't too close to the top of the triangle and draw a circle. Do the same but on the opposite triangle. (it will look like a vesica pisces)
5)Now, you draw a line through the vesica pisces and place the needle point of the compass on the line in the middle, measure the compass to the edge and draw a circle. Then draw a small diamond in the middle with a straight edge.
6) Now, you color in the shapes in any color you would like.
(Black and white pattern, hexagons and crossing triangles in the inside bottoms of the large triangles is optional, I did those with a straight edge to give the art piece more detail)
For our third benchmark, we had to create our art piece of the image. We had to try to display the geometric shapes that we needed and we could add as much detail as we could even if it wasn't on our recent benchmarks. What I chose to do was to paint my art piece on a square tile. I first drew my image on the tile with my compass and straight edge. Then I painted the shapes using acrylic paint.
When I was done with my art piece, I was really happy with how it turned out because I have never drawn and painted anything on tile before and I thought I did an amazing job for my first time. Some challenges that I had during this project was keeping up with the class and picking and image. To keep up with the class, I tried to work fast and still do a good job with my work and to pick an image I simply narrowed it to one with different shapes and one that was a little challenge for me. One Habit of Mathematicians that I felt I used successfully was Stay Organized. I kept all my rough drafts and I made time to complete this project aside the other load of homework that I had to complete. In the end it worked out well. One thing that I would do differently would be to add more detail in my art piece because I felt like if I had more time in the project, I could have done a much better job with lots of more detail. I really liked how I took time to do this project and it turned out really good in the end and I hope to do similar projects soon.
